Sunday, March 23, 2014

DIY evening dress tutorial, Florence and the Machine inspired


I am a huge Florence and the Machine fan, and I was stoked when I saw this dress because it's not that hard at all to make. Lace and jersey are especially nice to work with because they don't fray or need to be hemmed...and if you use stretch lace you don't need to insert a zipper.

These kind of tiered, ruffly dresses seem to be everywhere in various forms from Free People to Nordstrom. I think depending on the colors and the top template you use, you can make the look go from a classic to more bohemian dress.

When I am making my own patterns for dress design, I like to put together patterns that will get the desired outcome because I am not a pattern making expert and, therefore, like to have instructions handy for measurements, etc. This "tutorial" is really a combination of two basic tutorials for external blogs that I read and highly encourage you to follow.

What I hope is the takeaway is creativity and confidence in changing patterns/tutorials to your desired look. Sewing a dress is daunting, to say the least, but if you have some experience sewing it is definitely not out of reach. Have a set plan and break it up into steps-- and then go for it!

Materials:
  • A tight, well-fitting knit top.
  • 2 yards of black jersey (58-60" wide)
  • About 3 yards of contrasting dark green stretch lace (58-60" wide)
  • (Optional) scalloped edge lace trim
  • Sewing machine, matching thread, measuring tape, tailors chalk or some marking device... The usual sewing odds and ends.
As you can see from the photo above, there are two parts of the dress: the black lining (jersey, in this case) and the lace ruffle overlay. The pattern for the two are similar, needing the same measurements, but the layered skirt of the lace needs different instructions.

Step 1: Cutting out jersey pieces

Use this tutorial to get your measurements and pattern pieces. 
I recommend tracing the T shirt onto newspaper or pattern paper and cutting around it.
Cutting lace and knits can be a bit tricky because they move and stretch, so use weights and pins!


Sew the side seams of the skirt. 

Step 2: Cutting lace top

The top of the dress is the same pattern, so go ahead and cut that out. Then pin each piece of the lace top, right sides together, to the piece of the jersey top all. Sew all the way around, leaving about an inch open. Use the opening to turn the garment inside out.

 Hand sew the gap closed and sew up the side seams so you get a finished top. 
If you've never sewn lining before, watch how she does the lined top for this dress. 


Step 3: The lace tiers

1. Divide the length of the jersey skirt* by five and draw a line with tailor's chalk all the way around. This should get you about six rectangle sections. If it does not divide evenly, you can round it off.
It doesn't have to be exactly even.
 *your natural waist to the floor plus extra for shoes and hem 

2. Cut lace strips that are 6" x (your hip circumference + 2)".

2.5 (Optional) If you want a scalloped hem for each tier, you can use scalloped lace trip and/or the border of the lace fabric. Sew it onto one of the edges of the lace strips you just cut.

3.  Pin the strips onto the lines you drew, making sure each tier overlaps about an inch.

4. Sew all the way around. 

 These are the tutorials I referenced, and in combination are helpful in visualizing this step. 
They do the layered skirt differently-- if you want the ruffles, refer to the witch skirt. You would want twice the hip circumference instead with your lace strips, gathered and then pinned. The look you will achieve will be more similar to the first video otherwise.


Step 4: Attaching the skirt to the top

You should have now a finished skirt and a finished top. The final step is to attach the top the bottom. Flip the top inside the skirt, right sides facing, so the waistband of the skirt and bottom hem of the top are line up. Sew all the way around and you're done! 


Saturday, March 15, 2014

Current favorite tutorials...round up

I have been working on my prom dress which, spoilers, is not the original pattern idea I had in mind (see post). It is not because the pattern/idea isn't functional, I just didn't want to make it full length lace-- I am using that to make another dress for everyday in a purple knit. Stay tooned for that! (if you want)

I have a couple other projects going on right now, including the lace evening gown, which I will post in a bit when I finish putting the post/projects together. But, because I have been doing tons of research, I thought I'd share with you the a few of the tutorials I was looking at right now


Monday, February 10, 2014

DIY Free People Inspired Cold Shoulder Dress


After a looong hiatus for college apps I decided that, with my newfound free time, I would actually make my dress for senior prom. Despite the fact it is both terrifying and very tempting to buy a dress...I want bragging rights maybe? Basically.

I did a prom round up in the past, but these are going to be more project specific... and hopefully they'll be more helpful too.

So while I prepare myself for the *agony* of dress making, I've been doing some research to get started and decide which one to go through with. First thought was an off the shoulder dress like these that cost $380- 608 from free people. 


Or the red dress from the Summertime Sadness music video... for y'all Lana del Rey fans.


I think that it wouldn't be too hard to kind of simplify these by using this tutorial for the top part (ignoring the shorts part), but extending the length of the top to a maxi dress length.


That would presumably make the basic structure of the dress. Then you could use elastic or a belt to cinch the waist and sleeves (if you'd like). For fabric chiffon, lace, and/or jersey were my first thoughts, but I think anything with a good drape would work. Play with adding a slit, different neckline/sleeves, and maybe even fabric paint...

OR you could leave it relatively simple and add a chunky necklace and cool earrings to make it more interesting. Or maybe like a hair fascinator or something. Be creative!

Saturday, August 24, 2013

DIY Snake fingerless gloves

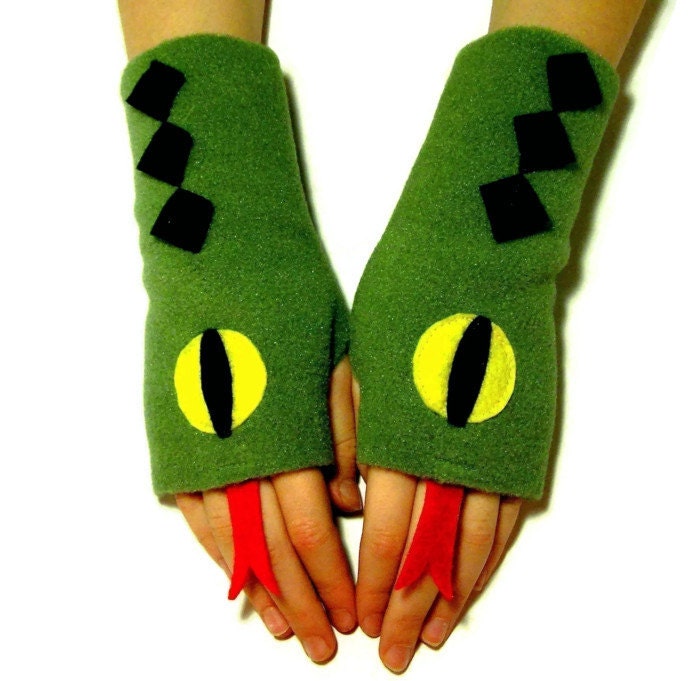
My brother was going to one of those role play, murder mystery game party things and his character was supposed to be Dr. S, a businessman with an unhealthy obsession with snakes... And, as my bro had nothing to wear that resembled snakes, he enlisted my help and we went out and bought a) a Nerf gun, just for funsies b) a rubber snake toy to wear around his neck and c) T shirts with which to make these:


I just traced around his hand/arm and added about a quarter of an inch or so all the way around and cut through 2 layers of T shirt. The eyes, scale things, and tongue I hand sewed on. If you need a visual:


It would have been a bit easier if I had sewed the features on then sewed the side seams, but all in all they turned out pretty cool... Considering I finished them in two hours (guys I take forever to hand sew anything)

Inspired by these from Etsy

Fingerless Gloves for ADULTS - Snakes (Ladies or Mens size S - XL) - Fleece Hand  / Wrist  / Arm  / Fingerless Mittens / Costume

Saturday, August 10, 2013

DIY Denim Patch Vest


It's here! After struggles with technology and fabric it's finally come together. It's a really fun-- and surprisingly easy-- project that anyone with basic knowledge of sewing can do. The name of the game is random and messy looking, so it's perfect for people (like yours truly) who like to play "fake it till you make it" when they sew. 


WHAT YOU NEED
  1. 2+ pairs of jeans of different washes, it looks better with more contrast (ie dark and light wash)
  2. Sewing machine and needle/thread (it's faster to machine sew but you can hand sew if you have the patience) 
  3. Fabric scissors-- pinking shears, or normal ones work fine
  4. Dark colored thread
  5. A vest or jacket (something with a fit/shape you like and that has little/no stretch like the denim you are using)
  6. Lining fabric (optional)
WHAT TO DO

1. Cut along the inseam and the sides seams on both jeans so you have total of 4 separate jeans fabric pieces.

Sunday, July 21, 2013

Preview: Denim Patch Vest DIY


I've been gone for ages because the end of last school year was crazy.. But hey, I've started a new project... and it's surprisingly easy!

I love vests and am really starting to love the look of mixing denims... Inspired by various projects found on Pinterest and the interwebs, I chopped up two damaged/painted on pants (with holes in rather embarrassing places) and meddled with them to fit the pattern of a vest I already had.

I still need to play with other details, so that will be a surprise for all of us


Until then, here are more looks/projects with denim:

HonestlyWTF roundup of patchwork denim

American flag, "punk rock" vest from men's jacket


This roundup of INCREDIBLE, creative projects with denim

20 Amazing DIY Denim Ideas

Mr Kate has a about 5 or 6 videos on creating awesome shorts like this...